How to Run a Mina Node on Google Cloud
A step-by-step guide to running a Mina Protocol node on Google Cloud.
Blockchain networks have long struggled with the troublesome trilemma - a quest to achieve true decentralization, security and scalability at the same time. Public blockchains like Bitcoin and Ethereum have preferred to de-prioritize scalability to preserve what they consider core to trustless, censorship-resistant networks - decentralization and security. This, ironically, has resulted in bloated nodes and put the blockchain infrastructure out of reach of most layman users, and again led to a dependence on intermediaries (node operators) instead.
While we are seeing the rise of numerous layer 2 scalability solutions on Ethereum, there has also been a simultaneous rise in layer 1 networks looking to tackle the trilemma. Mina Protocol is one such contender, aiming to replace the traditional blockchain with lightweight, easily verifiable cryptographic proofs, and is the subject of my post today. Before we get to Mina, let's talk about ZKPs first.
What is a Zero Knowledge Proof?
Imagine walking into a bar for a drink and, instead of providing your identity card as a proof that you are of legal drinking age, you show a different document that attests to your age without revealing your personal information. A Zero Knowledge Proof (ZKP) is just that - a cryptographic primitive that allows a statement to be proven without actually revealing the information behind it, only showing whether the statement is true or not. I find ZKPs fascinating, world-changing even, and will dedicate a separate deep dive post to it soon.
What is Mina Protocol?
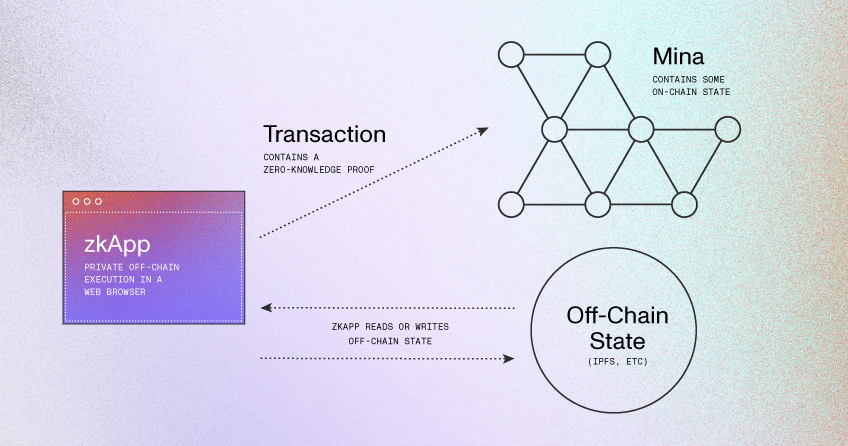
Mina promotes itself as the world's lightest blockchain, with advanced cryptography and recursive ZKPs ensuring that the blockchain size stays ~22kb. If successful, this will have huge implications for users of the Mina Network - each participant can be a full node and contribute to the security of the network without relying on intermediaries to run nodes.
Mina's breakthrough is made possible due to zk-SNARKs (short for zero knowledge Succinct Non-Interactive Argument of Knowledge), a recursive zero knowledge proof. Every time a new block is produced on Mina, a SNARK proof validating the block is simultaneously generated. Nodes store this proof instead of the entire chain, leading to an overall succinct blockchain. Also, Mina uses a proof-of-stake consensus mechanism called Ouroboros Samasika, which is derived from Cardano's Ouroboros mechanism.
Mina network has two types of node operators (also known as miners or validators) - block producers and SNARK producers. As a block producer, you can stake $MINA and potentially be selected to produce a block and win the block reward. Block producers rely on SNARK producers to generate the actual proof of transactions, and shell out a small portion of the block reward for their effort. This effectively creates a two-sided marketplace (aka snarketplace).
Mina is also developing zkApps (zero knowledge apps), smart contracts powered by ZKPs for programmability and extensibility. zkApps typically perform the computations off-chain, and send the ZKPs to the chain for validation.
Create an Ubuntu Instance on Google Cloud
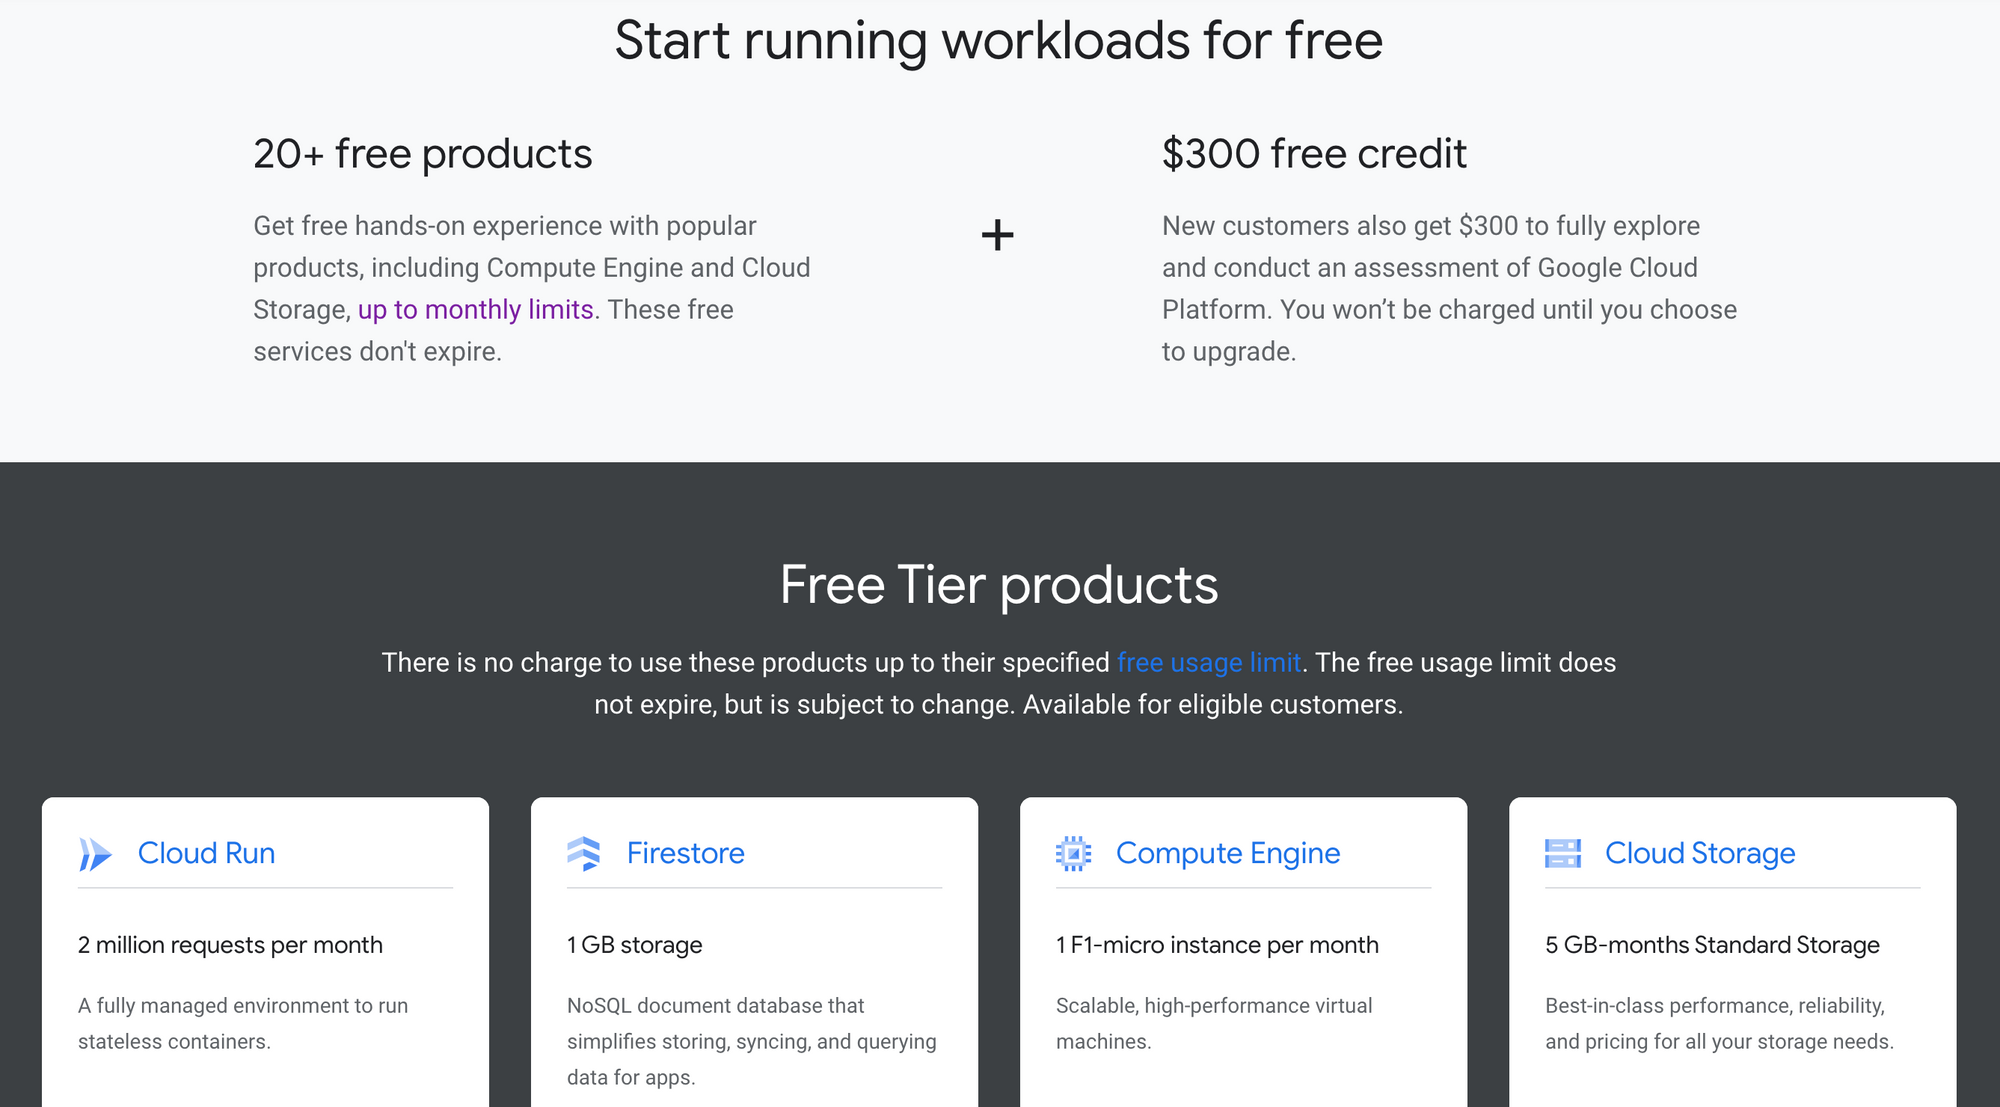
For this tutorial, I'm assuming that you already have a Google Cloud account and project set up. If you don't, sign up here - new customers get a generous $300 credit for 90 days, with several always-free products once the trial period expires. This is more than sufficient to test drive the Mina Protocol node deployment.
Google Cloud Terms of Service currently prohibits running of nodes using the proof-of-work mechanism but, as Mina uses proof-of-stake instead, we are likely fine for now. Of course, Google Cloud terms may change over time, so do review before use if you are concerned about any potential ramifications.
Enable billing on your account, create a new project, and follow the steps below.
- Click
Compute Engine > VM instancesfrom the Google Cloud console and enableCompute Engine API. - If you've just created the trial account, you should have a
defaultVPC network and the corresponding sub-networks for each region already created. If you're using an account that restricts default network creation, go toVPC network > VPC networksand create a VPC network and sub-network first. - Delete the default firewall rules (except
default-allow-ssh) fromVPC network > Firewalland create a new ingress allow ruledefault-allow-tcp-minawith default priority. Select the network you created earlier (ordefault), specify target tags asmina-node, source IPv4 ranges as0.0.0.0\0(this is a special range denoting 'anyone') and the specified protocols and ports as TCP8302. - Now, create a new VM instance from
Compute Engine > VM instances. Enter the VM name (say,mina), selectc2-standard-4 (4 vCPU, 16 GB memory)machine type from theCompute-Optimizedmachine family, and change the boot disk toUbuntu 18.04 LTS. UnderNetworking, add themina-nodenetwork tag. UnderManagement > Metadata, addenable-osloginandTRUEas a key-value pair. Leave other options as default and clickCreate. - Note: Running a block producer node on the Mina network currently requires at least a 8-core processor and 16GB of RAM. Running a SNARK worker node along with the block producer may require more RAM.
- Allow a few seconds for the VM instance to get created. In the meanwhile, have a look at my post on 3 tips to secure your GCP VM instance if you'd like to add some security measures to this node e.g using SSH forwarding via IAP instead of the default SSH firewall rule.
Install and Configure the Mina Daemon
Once the VM instance is ready, install the latest stable Mina release. SSH into the instance using the browser-based SSH option in Google Cloud console (or your preferred SSH client) and run the following commands.
# Update the package metadata to the latest version
sudo apt update

# Set up the stable Debian repository for Mina and install the latest version
echo "deb [trusted=yes] http://packages.o1test.net $(lsb_release -cs) stable" | sudo tee /etc/apt/sources.list.d/mina.list

sudo apt update

# Check and install the latest Mina version from here: https://github.com/MinaProtocol/mina/releases
sudo apt install -y curl unzip mina-mainnet=1.3.1-3e3abec
To verify that the Mina daemon is installed correctly, run mina version. The output should read Commit 3e3abecd4fd197017321d61a65a25f0bbdc40f3a on branch master (the hash value will change depending on the installed version).
Generate and Validate Keypair
Next, let's generate a keypair (set of private/public keys) using the mina-generate-keypair utility to run the Mina block producer securely.
# Install the mina-generate-keypair utility
sudo apt install -y curl unzip mina-generate-keypair=1.3.1-3e3abec

# Create a folder with limited permissions to store the keys
mkdir keys
chmod 700 keys

# Generate the keypair in the keys folder
mina-generate-keypair --privkey-path keys/my-wallet

# Restrict permissions to the key files
chmod 600 keys/my-wallet
When prompted, specify (and remember) the password used to secure the key files. Two files should be created - keys/my-wallet contains the encrypted private key and keys/my-wallet.pub contains the plain-text public key.
Lastly, validate that the private key works using mina-validate-keypair utility.
mina-validate-keypair --privkey-path keys/my-walletConnect to the Mina Mainnet
Now, let's start the Mina node and connect it to the live Mina network. The daemon will reach out to peers in the seed list to connect to the network.
# Start Mina node manually and connect to the network
mina daemon --peer-list-url https://storage.googleapis.com/mina-seed-lists/mainnet_seeds.txt
If you intend to stake on the network, use the --block-producer-key argument to provide the path to the private key holding your stake. If everything is fine, the Mina node will connect to the network once the synchronization completes. The node is currently running in manual mode though - run through the extra steps in this guide to configure node auto-restart.
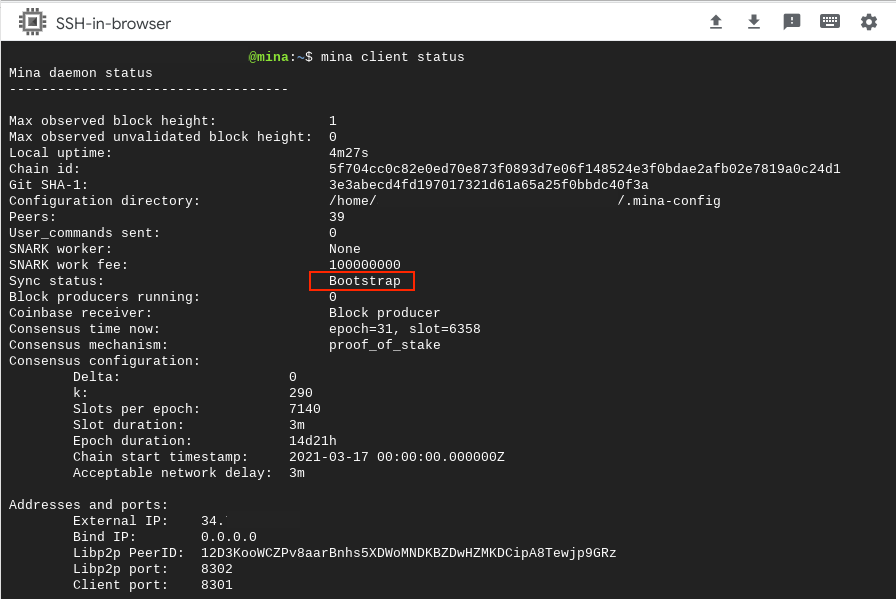
Finally, to check node connectivity, open another SSH connection and run the mina client status command. While the node is bootstrapping, you'll see Sync status: Bootstrap. Once it starts connecting to peers, you'll see Sync status: Catchup. When the daemon has successfully synchronized with the network, you should see Sync status: Synced. This completes today's walkthrough; go through the official documentation if you want to tackle other Mina use cases like sending payments or staking & delegating.